
| |
|
PA3 Owners Handbook On this Page : Connections Preamp cables Speaker cables 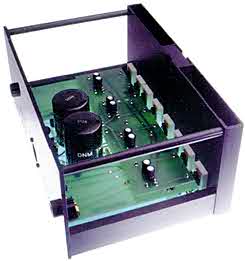 The DNM PA3 amplifier is made in two versions, unregulated with an output of 40 Watts per channel and regulated with an output of 23 Watts per channel. Both amplifier versions are two box units, one housing the transformer with on/off switch and fuses and the other containing the main amplifier.
DNM amplifiers are shipped in re-cycleable wooden crates which should be returned to your DNM dealer when the amplifier has been satisfactorily installed. Unpack the main amplifier and the power supply unit, plug the power supply XLR line socket into the power amplifier unit, insert the IEC mains cable into the power supply and then turn the power supply mains switch on. This switch is located on the back panel of the power supply box. After a few minutes the heat sink on the main amplifier will become warm and continue to heat for 30 minutes or so. Then it will gradually cool over a period of several hours as the unit warms itself right through. Proceed to connect up the PA3 amplifier to the rest of the system as described below, switching it off if necessary while the input connections are made. Under normal circumstances switching the PA3 on and off should produce no noise in the speakers. We recommend that the amplifier should be supported on a lightweight surface and placed so that its heat sink has a free flow of air for cooling. DNM Reson shelving is purpose designed and dimensioned to be exactly one or two DNM units wide and it is ideally light in construction giving optimum sound quality from the amplifiers. |
Connections All connections to the DNM PA3 amplifier are made on the rear panel and the front of the amplifier is all used for heat sinking. The connections are as follows:- one 3 pin XLR connector accepting the power supply feed, two 5 pin Din sockets (bayonet locking) for inputs and six pairs of 2mm speaker sockets for outputs. Three optional speaker connection systems allow Single Wiring or Bi-Wiring or Tri-Wiring, all in stereo.
The power supply reduces the mains AC voltage and sends it through an XLR cable socket which plugs into the chassis plug located on the amplifiers rear panel in the low centre position. Inside the amplifier the AC feed is rectified to power the amplifier circuits. In the PA3S the AC power is first semi-regulated by the T Network capacitor system before using DC regulation to remove power supply ripple so that the amplifier has a firmly regulated low noise DC power supply. Regulation decreases the specified power but increases the perceived power that the amplifier gives. Preamp cables The left and right channel signal inputs and speaker outputs on the PA3 are arranged so that the left channel is situated on the left hand end and the right channel is on the right hand end of the amplifier; when it is viewed from the front looking at the heat sink. Each channel of the signal input is fed to a separate 5 Pin Din socket to ensure symmetry of the printed circuit layout. Consequently for both channels the input signal is connected to pin 3 (left positive) and pin 2 (ground). A 'Y' lead is supplied with the PA3 consisting of one stereo wired Din plug for the pre-amplifier end and two mono wired Din plugs at the power amplifier end for use with DNM Series 3, 3a, 3b or 3c Pre-Amplifiers. Din connectors are chosen because they offer much better connection quality and sound quality than phono connectors. Other makes of pre-amplifier using phono connections will require two identical purpose made cables (Phono to Din) to be made and your dealer should be able to help with this. The best type of cable to use in a full DNM system is DNM Reson ribbon interconnect. Shielded cable may be needed with other pre-amplifiers to prevent hum when the pre-amplifier is muted or switched off. Series 3 DNM pre-amplifiers all use ground referenced muting and have an output resistance of 75 ohms to ensure silent interconnection and optimum performance. If other pre- amplifiers are used attention to these details may be required to obtain the best performance from the PA3. If unshielded interconnect cable is connected to the power amplifier before the pre-amplifier connection is made, a loud hum may occur because the high input impedance of the PA3 converts any stray hum induced in the cable into signal which is amplified. If this problem is intrusive then turn off the PA3 amplifier before connecting up. Speaker cables If the PA3 amplifier is switched on and connected to the loudspeakers when it is connected to the pre-amplifier a loud click may occur. To avoid this it is better to switch the PA3 off before connecting. All speaker connections to the PA3 are made via 2mm sockets on the back panel. The +ve and -ve pairs are arranged so that each cable enters the amplifier vertically giving space for three pairs of cables per channel for Tri-Wiring. The printed circuit tracks carry the full freqency range to all pairs of sockets but they are weighted for current carrying capacity according to function. The sockets nearest to the XLR power supply input are for Low Frequency, the Next >> set along are for Middle Frequency and the last are for High Frequency. Connect the speaker wires so that a single full range speaker is connected to the Bass connections, a two way speaker system is Bi-Wired to the Bass and Mid sockets and a three way speaker is Tri-Wired to the Bass, Mid and High sockets. In multiple wired systems DNM ribbon cables should be arranged in a stack so that all the polarities are on the same side to retain the desired amplifier loading. Avoid stacking the two separate channels together as this will increase the capacitance between channels which could cause instability to occur. In summary you can stack multiple wire feeds for an individual channel but try to arrange that the two channels lie separated whether you are using single or multiple wiring. If the channels lie side by side then put the ground (negative) lines closest to each other and the positive lines furthest apart. High capacitance speaker cables are not recommended for use with the PA3 amplifiers. They will reduce sonic performance and they could make the amplifier unstable. Non-recommended cables include co-axial types, very close spaced types, very fat low resistance types with complex construction and heavily stranded cables. Illustration of principal types of non-recommended cable types here The power amplifier simply amplifies everything that it receives from the pre-amplifier and drives the loudspeakers. It has no controls so it can be located in the system where it is not on view, the only requirement being that it is kept cool as described above. Only the power supply mains switch needs to be accessible to turn the system on and off. << Back to the Power Amplifier page. |
|||||||
|
|
© DNM Design 2018 (Legal & Credits) |
| ||
|
>Products<
|
Contacts |
Principles |
||